Today we’re going to use the fantastic 11 x 14″ photo below to illustrate some steps involved in preserving family photographs, especially larger photos. Apply these steps to your own photo archiving and preservation needs. For a look at storing smaller family photographs see How to Store Old Photos.

Step 1 – Finding Your Photographs

Many us of have boxes of photographs just like this tucked away in the basement or attic. These locations are prone to harmful temperature and humidity fluctuations and are susceptible to flooding, leaky pipes, and leaky roofs. When preserving family photographs it’s best to store them in a cool, dark place such as a closet in your living space and not in basements or attics. They are usually stored in non-archival, acidic boxes that will harm your photos.
Step 2 – Quick Inspection
A quick visual inspection of your family photos often reveals no problems at all. If any of your old photographs have significant damage, consider contacting a professional photo conservator.

In the case of the photograph above, while there is some surface and structural damage it’s not drastic enough to warrant professional conservation—as long as we’re careful while scanning it and preparing it for either long-term archival storage or matting and framing.
Step 3 – Scanning Photographs

Desktop scanners are relatively inexpensive and often come with easy-to-use software that will allow you to do your own scanning. There are also scanner apps you can download for your smart phone. Or, you could contact a professional photo organizer or scanning service.


This 11 x 14″ photograph was carefully scanned in two sections.
The software that comes with many scanners will allow you to scan larger photographs in sections, and then select a computer command that will seamlessly “stitch” the two halves (or multiple sections) together into a single image.

Once you have a scan you can:
1. use it to print additional copies for relatives / for albums / or for framing
2. email the digital image file to those who might want a copy for their own album or archive
3. safely store the original in an archival enclosure and an acid-free box
Step 4 – Archival Storage
When it comes to preserving family photographs, there are a variety of different types of acid-free enclosures available, each in a wide range of sizes—including a number of larger sizes—to fit your specific needs.
With enclosures, the fundamental difference between clear sleeves or bags and opaque envelopes or folders is transparency.
Using a clear enclosure will allow you to see exactly what is inside for easy identification, while envelopes & folders offer a slightly greater level of structural support and can hold either single- or multiple images.


Whether using clear sleeves or bags or opaque envelopes or folders when preserving family photographs, placing them in acid-free Drop Front Boxes will add yet another layer of archival protection while keeping your photos organized and accessible. These versatile boxes are relatively inexpensive, and are available in many sizes, in 1-1/2″ and 3″ depths, and in gray, black, and tan.
Step 5 – Identification of Family & Friends
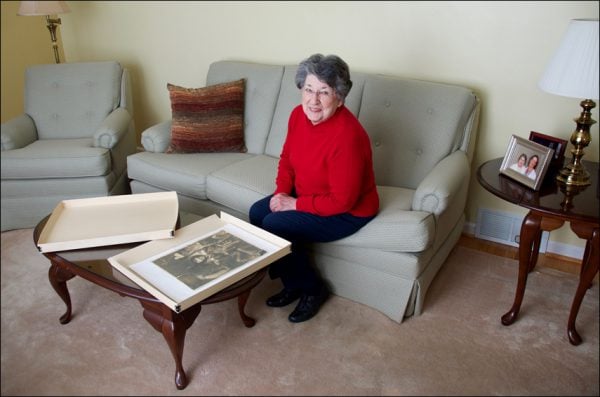
Florence’s photo is being stored in an economical 16 x 20 x 1-1/2″ Drop Front Box. It’s inside a Crystal Clear Bag which keeps pollutants and any finger oils off the actual print. Florence is identifying the individuals in the photo, along with the date, location, and other valuable information about the making of this image. She could type up the information and print it on archival Permalife 20 lb. Bond Paper to include in the box with the photo or hand write the information on the reverse side of the Card Stock.

Step 6 – Matting & Framing

Matting and framing a unique family photograph allows it to be enjoyed every day. Here are the steps to follow.
1. lay your photo out on a clean, dry surface
2. place Mat Board Samples next to the print to determine the best color match
3. measure the photo
4. enter your measurements and color choices into the easy-to-use Custom Mat Cutting Template
5. order your mat, frame and hardware
6. when received, mount your photo into its window mat using archival Mounting Corners
7. assemble your metal section frame or prepare a Gallery 12 Wood Frame
8. assemble the matted piece, a sheet of Optix UV-Filtering Acrylic glazing (to filter out harmful ultraviolet light), and the frame
9. hang your newly-framed photo (out of direct sunlight and florescent light) and enjoy it every day!
When displaying family papers and photographs, exposure to all light (visible and ultraviolet) can cause fading, darkening, and other changes. The best protection from light is to display copies of the originals and keep the originals in a box. If you display the original items, use ultraviolet-filtering glass or acrylic in the frame, and avoid direct exposure to daylight and fluorescent lighting.
Step 7 – Printing & Sharing Copies
As mentioned toward the top of this blog, once a photo has been scanned it’s possible to print multiple copies for photo albums and to share with other family members. It’s also possible to email a digital image file to far-off relatives and friends.

Preserving Family Photographs: Final Thoughts
Beyond the physical preservation of this photo in an archival bag and an acid-free box, of monumental importance is the information that Florence provided as to the who’s who and what’s what of this old family photo, information that can be shared with future generations. Without her input the story behind this photograph would be lost to the ages, and we encourage you to ask relatives to help with the same sort of identifications when it comes to your own family photographs.

In closing, we hope you’ll follow these 7 Steps when preserving family photographs—and family history!—in your own archive, now and for posterity, and will feel free to contact us here at Archival Methods with any additional questions you may have.
Blog Updated: February 5, 2026